Instead of going out for an expensive cooking class or a meal at a restaurant, find a recipe online, gather the ingredients, and learn to cook a new dish together at home. Set the mood with candles and soft music for a romantic and cosy evening.
Create a personalised scavenger hunt with clues that lead your partner to meaningful locations or memories you've shared. It's a fun and thoughtful way to reminisce about your relationship.
Make a set of DIY love coupons that your partner can redeem for simple favours, such as a massage, a movie night of their choice, or breakfast in bed.
Wrap up warm, grab some extra blankets, and thermos of your favourite hot drink, find a quiet spot, lay out a blanket (or grab some camping chairs), and spend the evening stargazing. You can use a stargazing app to identify constellations and enjoy each other's company under the night sky.
Create a memory jar together. Write down favourite memories, inside jokes, or things you love about each other on small pieces of paper. Read them together on Valentine's Day or save them until your anniversary..
Pack a picnic basket with your partner's favourite snacks and head to a nearby park. Enjoy a simple, relaxing day outdoors, complete with a blanket and good conversation.
Spend an afternoon exploring a bookstore or library together. Choose a book for each other or pick one to read together, and then enjoy a quiet reading session.
Take advantage of the outdoors with a low-cost adventure like hiking, biking, or exploring a nearby nature reserve. Enjoy the beauty of nature and each other's company without spending a fortune.
Dust off your favourite board games or try out new ones. Have a friendly board game competition or work together to conquer a challenging game.
Create a spa-like experience at home with DIY face masks, relaxing music, and scented candles. Pamper yourselves with a spa night without the spa price tag.
Remember, Valentine’s day doesn’t need to be an expensive ordeal. Keep it simple, and do the things that matter to you.
]]>This would be classed as anything that, as the title suggests, is outdoors soaking up nature! For this you could consider going on a hike (and perhaps finishing in a pub!) Or taking a trip to the coast, finding a nice coast path and rewarding yourself with ice cream or chips. Or maybe there’s a nice forest trail you haven’t been on yet?
You can never go wrong with food! As long as the recipient doesn’t have to cook it or clean it up that is! There are so many food options: picnics, BBQ in the garden, takeaways (which you could pair with a movie night or games night), restaurants, pubs, bottomless brunch, afternoon tea, high tea, all you can eat, street food, etc. The list goes on!
There is a whole world of live events out there! The most obvious would probably be concerts, gigs, or theatre performances. But you could also consider festivals, comedy shows, or even going to a live recording of their favourite tv show as an audience member!
Whether they like to shout at their team in support or silently observe, there are so many sporting events to choose from. There’s the popular choice of football or rugby games, and then you’ve got things like golf, darts, snooker, rallying, F1, surf competitions, sailing, dressage and ice hockey to name a few!
Ask them about their bucket list! Do they have one? What is on it? Is there anything that interests you too or that you could make come true? This is a perfect excuse to help them tick something off and create memories with you at the same time!
Self-care isn’t selfish and can be a wonderful gift to encourage someone to slow down, de-stress and take some time for themselves. This could include things like going for a manicure, pedicure, facial, massage, or even a trip to the spa!
Is there a part of the UK that they’ve always wanted to visit and just haven’t managed to get there yet? Or perhaps they have a most favourite place that they don’t get to visit often? This is your opportunity to make it happen and take them on a road trip, or, if it’s not necessarily something that interests you, organise for them to go away with their partner instead!
What countries are they yet to tick off of their list? Choose one and take them on an adventure! It doesn’t have to be for long, a few days is plenty, but it’s a great opportunity to see somewhere new and spend some quality time together exploring!
Does the recipient have children? When was the last time they had an evening off? Could you arrange a sitter or look after the children yourself so that the parents could go out for dinner or even have a night away somewhere?
When was the last time they had a weekend away with friends? Send them off for the day or for the weekend with friends doing something that they enjoy, even if it is just permission to go on a sesh with the boys/girls!
If you’ve got an adrenaline junkie on your hands then how about something like caving, coasteering or mountain biking? Or perhaps a hot air balloon ride, a sky dive (indoor or out of plane!) or go on a high speed zip line? Or there’s always abseiling, paragliding or white water rafting!
There’s plenty of art, culture and history around the UK to soak up! You could take a trip to an art gallery, visit a museum or attend ‘talks’ that inspire and interest the recipient.
In the UK these could be National Trust or English Heritage sites. Days like this are always a hit with my family because it usually ends in a trip to the cafe or a picnic! If it is something they are VERY interested in, you could consider an annual pass or membership.
The classics are things like cinema experiences, a competitive game or two of ten pin bowling (some even do glow in the dark events!), crazy golf, or a trip to the local arcade or theme park.
Treat your loved ones to a cooking class or a culinary workshop where they can learn new recipes, techniques, and indulge in the joy of creating delicious meals together. And if you’re really lucky, you may get to sample the results!
This could be a tour of absolutely anywhere that interests them! You could visit a local distillery and end in product tasting, or tour their favourite sporting ground, go on a pottery factory tour, or even a walking tour around a new city. You could even find filming locations for their favourite shows and do a tour based on those too!
Are there any classes that they’ve always wanted to try? Think dancing, pottery, jewellery making, flower arranging, blacksmithing, sculpture, photography, stained glass painting, candle making and shoe making, etc! The list goes on.
This could be anything to do with the natural world. Here we’re thinking about bird watching, animal sanctuaries, zoos, keeper for the day experiences, aquariums, seal spotting, boat trip, dolphin watching or a trip to a remote island to watch the wildlife. Places like Brownsea Island and Steep Holm come to mind!
I’m not talking about big music festivals when I say festivals but small events like craft shows, county shows, garden shows, art exhibitions (or art week), gin festivals, folk festivals, crufts, horse of the year.
You don’t have to leave the house to spend time with your loved ones. You could stay in and have a movie marathon with loads of snacks, cosy blankets and lots of laughs! Or maybe a games night with all of your friends is more your thing? Either way, spending time with people doesn’t necessarily mean you have to spend lots of money!
No matter how you choose to do it, making memories with people and spending quality time with loved ones can be much more rewarding than material gifts. So next time you’re looking for a special gift with someone, maybe consider one of these options and take the opportunity to enjoy the company of others, have fun and create lasting memories!
And just in case one of these ideas has piqued your interest, I have the perfect way of presenting the gift! Pop over here to have a browse of my scratch card collection to see how I can help you make this is a truly memorable gift!
]]>Picture this: You come home from a busy day, and there it is on your doormat - a colourful envelope with your name on it. Instantly, a wave of excitement washes over you. That card in your hands becomes a pick me up, and a physical representation of love, care, and thoughtfulness from those closest to you. Something that a digital message can’t quite replicate.
Sending a birthday card isn't just about the card itself; it's about the personal touch you add to it. Whether it's a heartfelt handwritten message, a doodle, or an in-joke, these little details make the card truly unique and special. It's a chance to let your creativity and personality shine through, showing the recipient just how much they mean to you.
In our fast-paced digital world, receiving a birthday card forces us to slow down for a moment. It's a gentle reminder to stop and send some good vibes out to those celebrating their special day. Taking the time to select or create a card, write a heartfelt, funny or simple message, and send it off is a lovely way to show that you care.
There's an undeniable thrill in receiving a surprise in the post! Opening that envelope and discovering a birthday card (or any card really) is a moment of joy. It's a delightful surprise that brings a smile to our faces as we feel loved. In a time when digital notifications have become the norm, a physical card stands out and makes the celebration even more memorable.
Sending birthday cards is a tradition that has stood the test of time. It's a way to honour our connections and celebrate the milestones in our loved ones' lives. By continuing this tradition, we preserve a sense of nostalgia, warmth, and human connection that can't be replicated by a digital message.
So let's raise our pens and toast to the power of birthday cards! In this digital age, they remain a meaningful way to express love and friendship and share joy. Whether it's sending smiles in the post, the personal touch, the moment of pause, the joy of surprise, or the preservation of traditions, birthday cards hold a special place in our hearts. So, let's keep this beautiful tradition alive, one card at a time, and make every birthday celebration truly unforgettable!
]]>Picture this: Laughing until your belly hurts, creating memories that last a lifetime, you know the kind, the ones you’ll be laughing about for years to come and feeling the warmth of genuine connection. It’s one of those ‘you had to be there’ moments. That's what happens when you spend quality time with your loved ones. No amount of fancy wrapping paper or bows can match the sheer happiness that comes from sharing experiences and strengthening bonds with loved ones.
Alright, let's get sentimental for a moment. Close your eyes and think about your most cherished memories. Are they centred around physical gifts or the adventures, conversations, and laughter you shared with your loved ones? I bet it's the latter. Memories are the priceless treasures we carry with us, and they're built through the moments we spend together, not the things we receive. One of my favourite Christmas memories as a child was not the gifts we received but the time we spent with our Gramphy riding a box down the stairs!
Physical gifts can fade, break, or be forgotten, but the connections we build with our loved ones are everlasting. Think about the inside jokes (we have SO MANY of these with friends and never fail to make us laugh), the shared stories, and the heartfelt conversations that make your relationships so special. These are the true gems that we hold on to.
Remember when you were a kid and the best birthdays were the ones spent with friends, playing games, and having fun? (Unless you have a boxing day birthday like me but that’s a story for another time.) Well, newsflash: That childlike joy doesn't disappear as we grow up. When we gather with loved ones, we tap into our inner child, unleashing laughter, silliness, and a sense of wonder that can't be replicated by any store-bought item.
Alright, here's the thing: Your presence is the present. When you show up for your loved ones, fully engaged and present in the moment, you're giving them a gift that money can't buy. Your undivided attention, love, and support create an atmosphere of warmth and appreciation that far surpasses any physical item you could wrap up.
So there you have it. The secret to a truly memorable and meaningful birthday celebration lies in the precious time spent with your loved ones. Leave the stress of finding the perfect physical gift behind and embrace the joy of shared experiences, heartfelt conversations, and belly laughs that make your relationships shine. Remember, the greatest gift you can give is your presence, your love, and your undivided attention. It's time to celebrate birthdays in a whole new way - with the gift of priceless moments and cherished connections.
If you need some inspiration for gift ideas which involve spending time with loved ones, then pop over for my round up of experience gifts based on my history of making scratch cards for those who are already giving the gift of time!
]]>Cue the spotlight and the roaring crowd! Think back to your own educational journey and the teachers who blew your mind. They had a knack for making even the dullest subjects come alive (my year 7 French teacher certainly knew how to liven up the class!) and left an everlasting impact on your life. Let's give a shout-out to these incredible mentors who have been making education a blast!
Saying ‘thank you’ to our teachers isn't just a polite gesture; it's a total game-changer. By expressing our appreciation, we're giving them a standing ovation for their hard work, dedication, and the sheer awesomeness they bring to the classroom.
These cards aren't just pieces of paper; they're a one-way ticket to letting teachers know just how much their hard work, late nights lesson planning and hours spent marking is appreciated. And let's not forget the invaluable teaching assistants who help to give that little bit extra!
Alright, it's time to make the card extra special! Add a heartfelt message that will knock their socks off. Share those memorable moments, highlight the epic lessons you'll carry forever, and let them know they're appreciated. It's all about personalising the love and making it a keepsake they'll treasure. And if you want to go one step further, opt for a personalised card to add their name to the front!
As the end of term approaches, let's give it up for our amazing teachers! Our thank you teacher cards are here to unleash a wave of appreciation and make them feel the love. It's time to give these superstars the recognition they deserve and rock their world with gratitude. Let's celebrate the teachers who have made a difference and turn up the volume on appreciation - because they truly deserve it!
As a graduate myself, I know firsthand the dedication, late-night study sessions, and countless cups of tea it takes to achieve academic success. Graduating with a first-class honours degree in Graphic Communication was a defining moment in my life. It marked the culmination of years of hard work and the beginning of an exciting journey in pursuing my passion for design.
My line of graduation greetings cards is designed to capture the essence of achievement and celebration. Each card is printed to order, come in a choice of colours, and some include the option for personalisation to make it extra special. These cards go beyond a simple congratulations; they help to represent just how proud you are of their huge accomplishment and serve as a keepsake to remember this milestone for years to come.
A graduation greetings card is not just a piece of paper; it's an expression of support and recognition. It carries the well-wishes and high fives from friends, family, and loved ones who have seen first hand the hard work and determination that went on behind the scenes. It's a reminder of just how far they have come!
In a world that is increasingly digital, there is something incredibly special about holding a physical card in your hands. My graduation greetings cards are designed to be kept as mementos, serving as a visual reminder of the hard work, perseverance, and personal growth that led to this achievement. They can be proudly displayed on a desk or kept in a memory box, serving as a source of inspiration and motivation for the exciting career that lies ahead.
Graduation is a remarkable milestone that deserves to be celebrated in a meaningful way. With my line of graduation greetings cards, you can not only congratulate someone on their achievement but also give them a keepsake that captures the essence of this momentous occasion. From caps to cards, I’d love to be a part of the celebration as you embark on a successful career in something you love. Remember, the journey has just begun, and the future is brimming with endless possibilities. Congratulations, graduates!
Step dads, we salute you! You didn't just stumble upon fatherhood; you chose it with open arms and an open heart. So, let's celebrate your awesomeness with a card that says it all. Whether you're creating a masterpiece with crayons or finding the perfect words, here are a couple of short and sweet messages to get your creativity flowing:
This Father's Day, let's celebrate the incredible step dads who bring joy, love, and laughter into our lives. With a heartfelt card and a playful message, we can show them just how much they mean to us. Whether you're expressing gratitude to your step dad or sharing a laugh with your bonus dad, remember that it's the thought and love behind the message that truly matters. Get creative, have fun, and make this Father's Day one they'll never forget.
Remember, the key to writing a heartfelt Father's Day message is to be sincere and authentic. Feel free to use these samples as inspiration and tailor them to reflect your own relationship with your step dad.
]]>Sample Heartfelt Messages for Grandads:
Grandads—the kings of fun and the keepers of wisdom. With their infectious laughter and the best stories in town, they truly deserve a Father's Day card that captures their playful spirit. Take a look at these lighthearted messages that will make your grandad chuckle with joy:
Remember, the key to writing a heartfelt Father's Day message is to be sincere and authentic. Feel free to use these samples as inspiration and tailor them to reflect your own relationship with your grandad.
]]>A Day Out in Nature:
Rather than giving a physical gift, plan a day out in nature with your dad. Choose a scenic hiking trail, go fishing together, pop to the coast for some ice cream (or chips!) or have a picnic in a park. Enjoy the fresh air and the calmness of nature, and create some lasting memories.
Sports and Music:
If your dad is a sports enthusiast or a music lover, surprise him with tickets to a live sporting event or concert of his favourite team or artist. Spending a memorable evening together, cheering for his beloved team or singing along to his favourite tunes, will be an experience he'll cherish. Or if he’s one to get involved in the action, book him a round of golf or a lesson in something he really enjoys.
Cooking or Tasting Class:
For dads who enjoy culinary adventures, sign them up for a cooking or grilling class. It's an excellent opportunity to learn new recipes and techniques together. You can bond over preparing and savouring a delicious meal, creating a shared experience that combines learning and quality time. Or if he’s more into wine, craft beers or whiskey, why not taking him on a tasting tour around a local brewery or a wine tasting evening.
Spa or Wellness Retreat:
This might not be an obvious choice but everyone deserves some relaxation and self-care, including dads! Treat your father to a spa day or a wellness retreat. Book a massage, facial, or a full day of pampering activities to help him unwind, recharge, and feel appreciated.
Road Trip or Weekend Getaway:
Plan a road trip or a weekend getaway to a destination your dad has always wanted to visit. It could be a nearby city, a picturesque town, or even a camping adventure in the great outdoors. Exploring new places together will create unforgettable memories and provide an opportunity for quality conversations and bonding. It’s also a great excuse to get the whole family in on the plan so he can spend quality time away with everyone.
Now you’ve got your thoughtful experience idea, you need a thoughtful yet fun way to gift it. Let’s face it, a printed receipt doesn’t really cut it. That’s where my scratch cards come in! They are perfect for letting someone know that they’re going on holiday, have tickets to an event, or you’ve planned the perfect day out for them! Scratch cards are the perfect way to present these hard-to-give gifts, adding an element of surprise and excitement to your Father's Day celebration. They’re also really easy to order. You tell me what you would like printed under the scratch off panel, I make them and them post to you! It couldn’t be easier!
I hope this list has helped you to think a little more outside of the box of traditional gifts and I would love to know what you have planned for your dad this year!
]]>When it comes to expressing our love and appreciation for our loved ones, finding the perfect gesture or even words can sometimes be a challenge. We want to go beyond ordinary, generic expressions and find something truly special. That's where my scratch cards come in. With their delightful designs and messages tailored to suit you, these scratch cards offer a unique and interactive way to show your loved ones just how much you care.
Shop: Personalised Birthday Present Scratch Card
Shop: Personalised Floral Feeling Lucky Match Three to Win Scratch Card
Shop: Personalised Marry Me Scratch Card
When words alone aren't enough to express your appreciation for your favourite human or if you need that something a little extra to reveal a big surprise, my scratch cards come to the rescue. They combine the element of surprise, thoughtful messages, and personalisation to create a truly memorable and heartwarming gift. So, whether it's a birthday, anniversary, or any special occasion, head over to the scratch card collection and explore the variety of scratch cards that will show your loved ones just how much you care.
]]>
Spring is finally here and it's time for a little spring cleaning! You may have noticed that the Joanne Hawker website has had a small make over! Nothing too drastic but I think you'll agree that it looks much fresher and is much easier to navigate!
Hopefully the new navigation and expanded range of categories will make it easier to help you find the perfect card for whatever occasion you have in mind. Mother's and Father's day now have their own individual collections (this drove me mad too!) and you can now browse by card type, (scratch off, certificate, personalised or regular!) occasion (birthday, anniversary, etc...) or by seasonal events like Valentine's day for example.
This blog will also see a little more action with lots of new posts planned and coming your way soon! Expect to see posts on new products, seasonal content, ideas of what to write in your cards and much more. I hope you'll come back soon and see what's new but in the mean time, cheerio for now and speak to you soon!
]]>With Christmas less than a week away and the postal system delaying orders left, right and centre due to the on going pandemic, I thought it would be a good idea to remind you about my free printable Christmas IOU Coupons!
The download comes with four coupon to an A4 page and are a lot less pink than in the photo! They're more of a reddy orange colour but the camera didn't capture it too well! Simply print them out, write the recipients gift on the lines and sign it off as who it's from and you've got yourself a pretty emergency IOU voucher! Merry Christmas! x
]]>What is a sun catcher sticker?
In short a suncatcher is a special transparent sticker that has a design printed onto special holographic diffraction window film which you then apply to windows in your house, flat, or building that receive a good degree of direct sunlight!
What do the stickers do?
When a sun catcher is placed in direct or really bright sunlight, the diffraction film causes the suns rays to disperse around the room which result in the most beautiful rainbows! This is possibly the reason as to why they are also known as rainbow makers! Not only do they create beautiful colours that move around the room with the sun but they also bring joy, colour to dull rooms and generally lift spirits!
Are they easy to remove?
Yes! And you can reposition them too! If you're worried about placing a sticker and then not being able to remove it, or living in rented accommodation and leaving sticky marks on the windows, worry not!
All you need to do to remove them is carefully get your nail behind the suncatcher and gently peel it away from the window. Once you’ve carefully peeled it off, set it down on a dust free surface (use the original backing if you still have it) and clean the window. You can barely see where the sticker has been and there is no sticky residue left behind. If you'd like to reposition it elsewhere simply clean that surface, and apply it like you did the first time with water!
If you'd like to watch me do it, I have created a video showing me removing and then repositioning my moon rainbow maker in our lounge!
What designs do you have?
I currently have a number of designs but intend to keep adding more! At the moment you can find a happy sun, moon, a hidden tiger and a floral 'stop and smell the flowers' design! And I've got them dotted all over my house to make sure I capture the sun throughout the day! If you're in the UK you can shop here! Otherwise if you're outside of the UK I have them listed for you over here!
1 - Asking big or important questions!
Asking someone to move in with you, be your partner, or even marry you can be an exciting but nerving wracking time! Using a scratch card can help take the edge off of asking that all important question whilst also giving the recipient a memento of this really special occasion that they can treasure for years to come! They're also a fantastic way to invite close friends and family into your wedding party and to play an important role in your big day such as asking someone to be your Bridesmaid or your Maid of Honour! And the best part is, you get to watch their face as they slowly reveal the big surprise!
2 - Giving hard to gift presents!
This was one of the main reasons I created my first range of fully personalised gifting scratch cards back in 2015! Booking emails or receipts aren't the prettiest thing to look at so I created a fun new way to gift them through scratch cards! This brought the fun back into gifting something you couldn't physically hold! These kind of gifts range from anything like gig and theatre tickets to trips abroad, weekends away, experience gifts such as llama walking or driving a super car around a race track, to things like afternoon tea and trips to the spa!
3 - Making an announcement!
Maybe you're looking for a way to tell family or friends that you're having a baby! Or perhaps you want to tell them that you're having a little boy or a girl? Or maybe it's something else entirely! I have cards for specific occasions such as pregnancy announcements but I also have those where you can announce anything you like!
4 - Simply sending messages of love!
I create a lot of these around Christmas time or during times of being told to stay at home and they're always really sweet! It's like sending someone a surprise pick me up and lets them know that you've been thinking about them! I particularly love the blank ones that I've created for children to draw their own design on the front and then create a scratch message for a relative, like a grandparent perhaps! You just know that what ever they create will be special and will be cherished by the recipient!
Washi tape has been around for years but suddenly it's everywhere and you might be wondering what it is and how to use it! This post will help with just that!
So, what actually is washi tape?
Washi tape is a thin, usually decorative (or plain coloured) paper tape (or masking tape) that can be used in a variety of projects. Although the rolls appear small, they generally carry around 10 metres of pretty tape which lasts a lot longer than you think! This paper tape is not as tacky as more plasticky clears tapes meaning that it can be removed from most surfaces and repositioned without any damage!
As washi is made from paper and renewable resources, it is much more eco friendly than clear sticky tapes as it can be recycled! This means less guilt for you and an even better excuse to add some to your basket!
How can you use it?
Washi tape has so many uses! You only have to do a quick search on pinterest to see all of the different projects! I'm going to share some of my favourite ideas below for you!
• Scrapbooks
There are many ways that you can use washi within your scrapbooks! You could use it to stick down photos or elements that you might want to move again later. It can be used for creating fancy titles and headers (simply write over it in marker pen) or for creating interest. Cut up pieces of washi to make your own washi stickers, or use a die cutter to create borders with interesting edges! Or create a background grid, or a solid colourful background by lining up lots of different colours, sizes and patterns! Either way, it's a great way to add a bit of interest to your scrapbook!
• Bullet journals
This is one of my favourite things to use it for! I use washi tape within my own journal to help make titles stand out, to create page divides or to just generally pretty up a page! It can also be used in the same way that it is used in scrapbooks for sticking in lists, photos, tickets and other bits and pieces you want to stick down. It's also handy for making pretty tick boxes, covering up mistakes or hiding things you no longer want to see. The bujo's I use only come with two ribbons so if you want to mark a particular page you want to be able to find quickly, you can fold some tape over the edge of the page to easily find it again! It's a way of quickly bookmarking and finding important pages! This can also be done in diaries and planners!
• Sealing cards
Don't fancy licking the back of the envelope to seal it shut? Seal it with pretty washi tape! Not only does it mean that you don't have to lick the gross glue but it also adds a bit more pretty and interest to the envelope!
• Special touches to gifts and orders
If you've spent ages choosing the perfect gift then you want to make sure that it comes in a pretty package too! Washi tape can be used as an alternative to clear sticky tape which is not only better for the environment, it looks nicer too! It can also be used to stick down gift tags too!
• Mini flags
Mini flags made using washi can be used for a number of things! You could add some to a paperclip to make simple but pretty book marks or markers for journal pages. If you put a flag on the end of a cocktail stick you could use them for labelling foods at a party or gathering, for example marking gluten free cakes. Take two cocktail sticks, some cotton thread and some washi flags and you've got some mini bunting for a cake topper!
• Decorating book covers, stationery or pots
If you've got a really boring notebook, binder folder or pen pot that you want to jazz up, add some washi tape! Create a rainbow of different coloured or patterned tapes, add a colourful stripe or cover the whole thing!
• Computer keyboards
I haven't been brave enough to try this one myself but I have seen people who have covered their keyboards in a variety of colourful washi tape and it looks beautiful! It definitely brings someone relatively boring to life!
• Labelling
If you've got a lot of cables lying around and you never know which is which, colour code them and write labels using strips of washi on the plug or make a flag to wrap around the cable! It's also handy for labelling stationery, drawers, or anything else that you might want to label, just ensure that it doesn't get wet!
Got some ideas? Great! Let's head over and view some washi tape!
]]>
Happy eat all of the chocolate day everyone!
I made a last minute Easter egg bunting to hang in my kitchen window after I saw that children will be looking out for eggs in windows around the village as part of an egg hunt whilst out on their daily exercise! So I thought that I'd share my artwork with you so that you or your little ones can colour it in and join in the fun! All you need to do is colour in the patterned eggs, cut around the shapes, punch some holes in the tops of the eggs, thread with string, and hang!
To download the printable PDF, all you have to do is click here, and then either save for later or print right away! If you do decide to make one, I'd love to see it! Tag me over on Instagram stories and I'll share them!
Enjoy!
]]>
Making some home baked goodness doesn't need to be complicated, messy or expensive! These delicious, gooey, salted caramel chocolate brownies went from box to oven in just 10 minutes! Yes, I said box. You wouldn't even know that these were minimal effort, just add an egg and water brownies! This particular batch were from Betty Crocker and needless to say, didn't hang around for long before they were snaffled up!
A card is more than just a folded piece of printed paper. They are actually a really great way of getting across how you really feel without actually having to say it out loud. If you're yet to decide on a card, I've got ones for Mums to be, new Mums, thank you Mum, ones for the single parent, ones for the step mum, and even scratch and reveal tokens of appreciation. There is something for everyone!
Sometimes kids come out with the most brilliant things or at other times they notice things and gestures that we may over look. So I've made a free download for you to print and encourage your little ones to draw a picture of their brilliant mum (I really hope I get to see some of these! Kids drawings are ace!) and then list the things they love about their mummy. It could be absolutely anything! And may even raise a few smiles, some happy tears or produce some giggles!
And don't forget the flowers! There are some wonderful seasonal flowers around at this time of year! My current favourites are the bright and colourful tulips - especially those in yellow! They only cost a couple of quid, and they're a really cheerful addition to any gift! Hand tie them with some of your own ribbon to add a quick and simple personal touch!
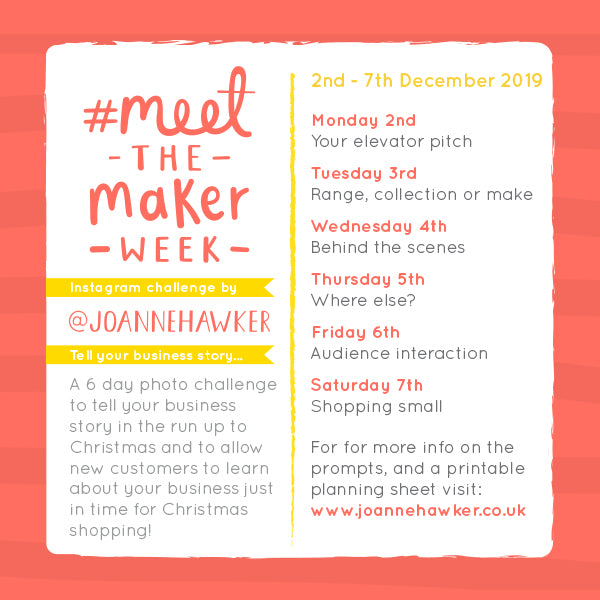
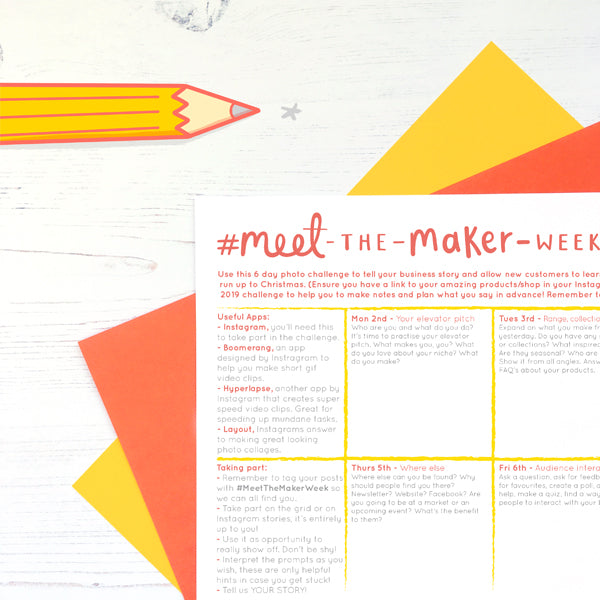
]]>Each year there are a few vague prompts that are widely open to interpretation but can also leave people feeling a little stumped. There are also some which can be a little more difficult than others, so, I thought it would be a great idea to put together a blog post with some of my ideas and interpretations of the prompts. These are just my ideas and I'm not saying you should follow these! I'd like you to interpret them in your own way! Just think of this as a little help if you are a bit stuck!
If you're yet to download the planning sheet, you can do so by clicking here!
1. Story
This prompt is hugely open to interpretation as it could be a story about anything in your making life! It could be a story about how you got into making, why you started your business, where you are from and how you ended up there, how you learnt your skills, was there a light bulb moment? At what point did you quit your day job (if you have!). What do you want to tell the world about you? There are so many opportunities to tell a story about your small business. The hardest part will be choosing one!
2. Hands at work
Show your hands mid make! What do they do? How hands on are your makes? Perhaps it's as simple as holding a pen or paint brush. Or perhaps they are dry from saw dust or are covered in clay from throwing pots. How do you use them? What do you put them through?
3. Time
How long have you been doing this? How long did it take to learn your craft? How long does your average make take? What do you spend your time doing? Do you have a limited amount of time to get things done? How is your time spent?
4. Branding
Do you have a logo? What is it? Perhaps you have a certain style? A precise colour palette? Are you known for bold out there colours? Pretty pastels or monotones? Do you always use the same fonts? What is your brand about? What do you stand for? How do you tie it all together? What do you want your brand to say when people see it?
5. Close up
This is an opportunity to show a specific part of your product or process. Is there a detail you really like adding to a product? Perhaps it's a label, a stamp, or a hidden message. Or maybe a colour, a texture, or even a character singled out from an illustration. Focus on something that could be over looked or something that you particularly like or is special.
6. Reducing waste
What are you doing to reduce your impact on the environment? It could be as simple as switching from cello sleeves to eco sleeves or none at all. Perhaps you're trying to buy less plastic. Perhaps, you have some systems in place meaning nothing goes to landfill? Maybe your makes are made from recycled materials? Or maybe you're still in the research stages of it all and are looking at ways you can make a small difference. It doesn't have to be a huge gesture. All the small ones add up to bigger things!
7. You
Tell the world about the maker behind the makes. Who are you? Is it just you? Do you have a team? Introduce yourself. What do you like? Where are you based? Do you have any fun facts? What makes you, you?
8. Love to make
What do you enjoy making the most? Why do you love it so much? Is it the over all design, the process, the reaction from your customers or followers, or is it as simple as the colours or materials used? Why does it make you happy? Is it rewarding in some way? Perhaps theres a back story?
9. Rough / Mock up
What does your work look like during the design process? Do you create rough sketches? Do you make quick, scruffy looking mock ups to test the way it works? How does your design process look? Do you keep neat and tidy notes, or are you a scrawl over anything around you kind of person? How does the idea look before it's a polished piece?
10. Authentic space
This one is about showing how your space really looks! It's not about tidying it for the 'gram. It's about being honest, mess and all! Are you generally immaculate or are you surrounded by paper, lists, materials, off cuts and chaos! Workspaces can be spare bedrooms, offices, sheds, kitchen tables, and even your sofa! It's where ever you get creative! There is no right or wrong for this one.
11. Range
Show us a product range (or even just a product) and tell us everything there is to know about it. Why did you make it? Why do you like it? Does it have a story? Who is it aimed at? What have people said about it? How long have you made these? Is it a new range? Perhaps it's your best seller. Either way, show off something you've made!
12. Learning curve
What has been your biggest learning curve or challenge that you have had to over come? Perhaps you're still in the middle of it? Are things how you thought they would be? What have you learnt from it? What you say to anyone else going through the same thing? It doesn't have to be anything big, perhaps you've had to learn a whole new skill set? Perhaps you've had to learn a new piece of software and it wasn't as easy as you expected? Or perhaps there has been something in your personal life which has made finding time to be creative difficult. It's all valid.
13. USP
USP is your 'unique selling point'. What makes you stand out from the crowd? What makes you different or unique? Don't shy away and undersell yourself here. Be proud and really sell yourself! What do you have that your competitors don't? Are there unique materials, patterns, illustrations, or style? Or perhaps you're the first person to ever create this product?
14. Current project
What are you working on at the moment? How many projects have you got on the go? Are you working on new things? Are you working on your social media? Are you designing? Are you thinking up a new range? What's on your list? Perhaps you're giving your brand an over haul or working on your website? What is your current project?
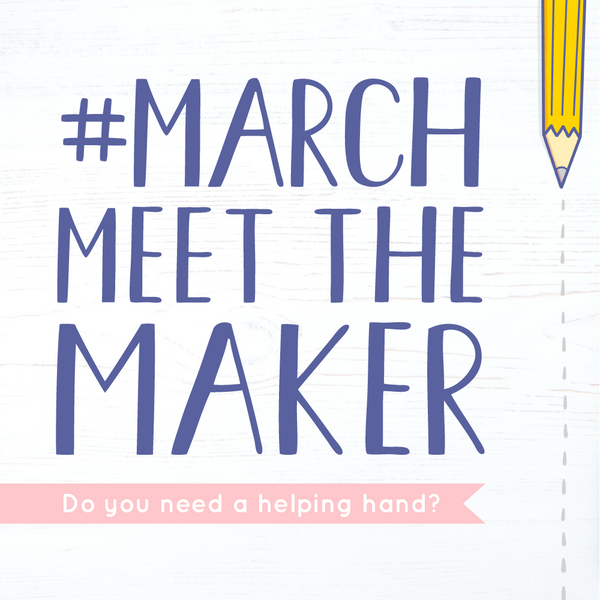
15. Help
What are you struggling with right now? Is there anything you need a little with or a second opinion on? Is there anything you'd like to know? Ask your audience a question, ask for their opinion or ask for help? Have you asked for help recently?Do you have any regular helpers? No matter which way you decide to look at it, it's important to remember to never be afraid to ask for help!
16. Self care
How do you unwind and take care of yourself? What do you do to chill out? Are you a get outside person? Or perhaps a big blanket and a book person? How do you switch off after a stressful day. Whilst this challenge is about your business, it's also important to show that it is okay to take to take a break and let your brain refuel.
17. Proud of
What are you proud of? And don't say 'nothing'! Because that's not true! It's not being big headed. It's all about celebrating things we are proud of today no matter how small. Perhaps it's having the courage to push yourself to do something that you were really nervous about and you did it anyway. Perhaps it's opening your Etsy shop or getting your first sale. Perhaps you've reached a milestone lately? Maybe you made a huge decision and you're so pleased that you did it? Or perhaps you said no to something and you feel loads lighter? Did you push yourself out of your comfort zone? Did you make 100 sales? Did you do a custom order that you really enjoyed? Perhaps you've had a tough week/month/year and you've managed to pull yourself through. Have a good think. It can be anything, I know you've got something!
18. Technique / Skills
Does your craft require a particular technique or skill? What have you had to learn to be able to make what you do? Is there a technique or skill that you are currently learning?
19. Packaging
How do you pack up your orders? What do you use? Do you have branded stickers or stamps? How do you display your products? What do they come in? What materials do you use? Is it bright and colourful? Is it eco friendly? Perhaps you want some advice or feedback on yours? Or are looking for some ideas?
20. Marketing
How do you market your products? Do you have any tips for others? Perhaps you're looking for new marketing ideas? Do you have a mailing list? Why should people join it? Are you on other social media? Why should people follow you there? How do you feel about marketing? Does it make your skin crawl? Does it make you feel uncomfortable? Why? Have you nailed it? What tips have you picked up over the years?
21. Change
This one can be interpreted in so many ways! It could be how your business has changed over the last few years, or even something about it that you're thinking about changing in the near future. Maybe you've changed your mind recently about a style, product or material. It could be a completely new change of direction, craft or skill set.
22. Tools & Materials
What do you use to create your masterpieces? Do you have any fancy machines or beautiful materials? Needles and threads? Pots of pens? A well used paint palette? A great big slab of clay? What can't you live without? What do you use on a daily basis?
23. Photography
Where do you take your photos? Do you take them or hire a professional? Do you have a set up? Do you balance your makes in a window or use the kitchen table? Do you use a DSLR or do you use your phone? Do you use props? Do you have any fancy backgrounds, hints, tips or tricks?
24. Personal touch
How do you add a personal touch to your products or service? Do you create personalised items? Do you write a hand written thank you note? Do you add anything extra? Do you offer gift wrap? Or a send direct service?
25. How it’s made
Don't panic! I'm not asking for a step by step! Just a part of the process that you feel is interesting, enjoy, or doesn't get seen very often. What do you use? Materials? Are their specialist tools? How do you use them? Where do you make this product? Boomerang videos or hyperlapses (sped up videos) can work really well here.
26. This or that
Think of this as an opportunity to gather opinions! Do you prefer this colour way or that one? Do you prefer this design or that one? Would you buy this or that? Would you do this or that? Do you see where this is going?
27. Future goals
Where do you want to be in the future? What goals do you have for the next year? Next 5 years? Or even just for the next few months. What are you working towards?
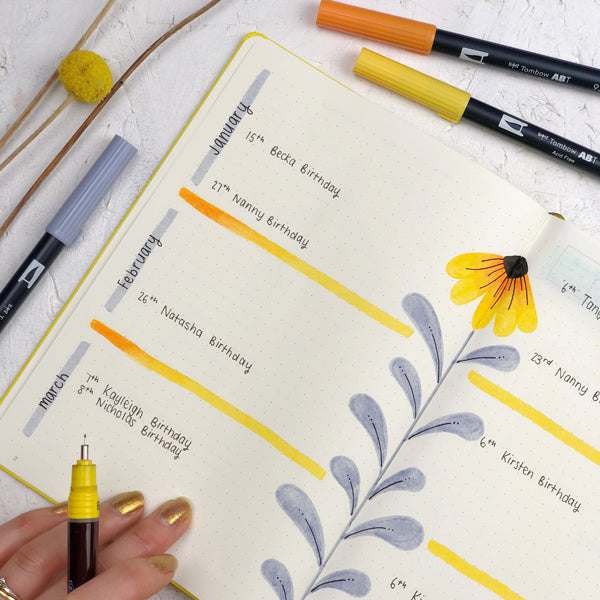
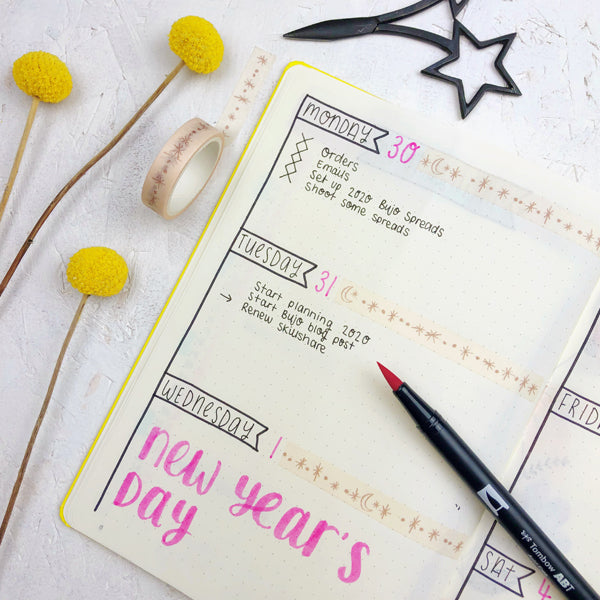
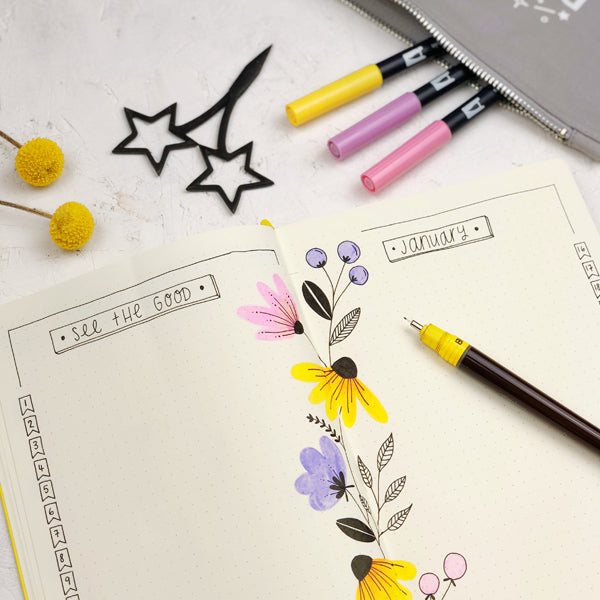
28. Planning
How do you plan your time? How do you stay on schedule? How do you plan your makes? How do you plan anything? What do you use for your planning? Are you a notes every where person? Do you draw all over the walls? Do you have a monthly or yearly planner? Perhaps you write everything down in a diary or bullet journal?
29. Self promotion
It's exactly what it says on the tin. Get out there and promote yourself. Don't feel gross about doing it because you've been given permission to really go for it! (Not that you need permission or anything!). Tell us about something you've added to your shop recently? Tell us where to buy it? How much is it? Why are you good at what you do? Promote, promote, promote!
30. Work life balance
How do you balance your work life with your home life? Are you a workaholic? How do you separate the two? What do you have in place that ensures you get an equal (or as close to!) measure of both? What does your balance look like? What are you balancing? Is it more of a juggling act?
31. FAQs
FAQs are your 'frequently asked questions'! Use this as a space to answer the questions you get asked over and over. Use it as an opportunity to do a little Q&A! If you don't have any FAQ's, make some up! For example, 'can you do XYZ in a custom colour?', or 'can I personalise that with a name?', or 'do you ship internationally?'. Use it as a chance to tell people about what you can do for them.
I hope these ideas have helped with anything that you have been stuck with! I look forward to seeing what you come up with! See you on the 'gram!
]]>Telling someone how much they mean to you shouldn't cost the earth. And Valentine's Day is no exception. Yes it's a day of love and romance but that doesn't mean that you should break the bank.
Here a few ways that you can thoughtfully celebrate Valentine's day without being over the top but still have a meaningful time together.
1. Say it all with a card. Sometimes cards are a bit of an after thought once the gift has been purchased but they are actually a really great way of getting across how you really feel without actually having to say it out loud. It doesn't have to be cheesy romantic, it can be funny, observant or completely personalised. It's all about how you make that person feel when they open it and read the message. That's where the magic is.
2. A night in is the new night out! Jump onto Pinterest and find some new meal ideas that you've been meaning to try but never seem to get around to it. Perhaps even split the cooking? One person could make a surprise main whilst the other makes a surprise dessert! It doesn't even have to be complicated. There are plenty of quick and easy one pan meals and no bake desserts to whip up in no time! Personally, I'm going to be have a go at the Lotus Biscoff cheese cake! Yum yum!
3. Fresh air and freedom. Get outside! Find yourself a nice walk around some woods, along the coast or a national park. There are plenty of places to check out walks near you. Walking Britain is a great place to start, as is the National Trust. Perhaps pack up a picnic, with some nibbles and a thermos flask of tea, coffee or hot chocolate! Or if picnics aren't your thing, perhaps find a route with a tea room or cosy pub along the way to have a snack, a warming brew or a bite to eat.
4. Get your make on! Handmade gifts can be some of the most thoughtful and treasured! Perhaps you've got a big surprise but are not sure how to work up to it? Then how about a treasure hunt? Or maybe the treasure hunt is just for a bit of fun and is filled with reasons why you love them? Who doesn't like a treasure hunt? Or perhaps instead of gifts you want to give IOU's (I owe you). These could be jobs that the other person usually does but with these tokens roles are reversed. Or perhaps you want to make them for things like a massage from you, or you'll be on tea duty for a day or you'll look after the kids whilst your partner goes out with friends.
5. Nibbles, blankets and boxsets. What's better than snuggling up on the sofa with a new boxset to binge or a handful of your favourite movies? Throw in a blanket and a few bowls of snacks and you're set for a cosy night in with your favourite. Throw in a few candles and a bottle of wine too for bonus points!
6. Share the love! Hang out with your friends! Invite them all over for dinner, get everyone to bring a dish, some snacks, dessert or a bottle and have a great night in together! Make it all about friendship and celebrate each other rather than Valentine's.
I hope that has helped you to come up with some ideas about how to spend Valentine's with your nearest and dearest this year. I'm sure what ever you do it will be perfect!
]]>You've the found perfect Valentine's card (if not, don't fear I have some here for you) and now you're stuck. It's really hard filling in such a special card isn't it? You want to get it just right, so I'm here to help! I've put together a few quotes and have put together a list of things to help inspire your own messages for Valentine's this year! Just use them as starting points to help inspire your own messages of love.
Before we begin, I just wanted to put it out there that you don't have to fill a valentine's card with mush (but you can if you want to!) You can go funny, sarcastic, to the point, simply cute (or if you want to pour your heart out, go for it!). Just do what feels right to you and I'm sure your other half will love it! I
To your partner:
- "You’re kinda, sorta, basically, pretty much always on my mind." - unknown
- "When I follow my heart, it leads me to you." - unknown
- "Love you yesterday. Love you still. Always have always will." - unknown
- Perhaps write a list of 3 or 5 reasons why you love them? How do they make you feel? What is special about them? What makes them, them? What is the next stage in your relationship? It's a good chance to ask someone to move in with you or perhaps even an engagement if you're ready.
To your fiancé:
- "Every love story is beautiful, but ours is my favourite." - unknown
- "Even though I have seen you a hundred times, I still get butterflies each time I see you." - unknown
- "No matter how much I say I love you, I always love you more than that." - unknown
- Perhaps mention how you're looking forward to being their husband or wife? And you're excited to start a new chapter together. Look to the future? Perhaps this time next year you will be married? How many days to go until the big day? Re-iterate why you love them and what it is about them you love so much? Remind them how special they are and how they make you feel.
To your husband or wife:
- "A husband/wife is a promise that I will have a friend forever.” - unknown
- "I ask myself every day… How did I get so lucky to marry my best friend in this world." - unknown
- "Marriage lets you annoy one special person for the rest of your life." - unknown
- How long have you been married? Could it be phrased as trips around the sun together? What do you enjoy the most about being married to your best friend, soul mate or partner in crime? Do they have any funny/cute/annoying habits? Why do they make you so happy? What makes them special? How do they make you feel? Perhaps a list of reasons why you love them? It's a great opportunity to express gratitude for them and everything they do.
To your friend or galentine:
- "They invented hugs to let people know you love them without saying anything." - Bil Keane
- "A real friend is one who walks in when the rest of the world walks out." - Walter Winchell
- "A friend is someone who understands your past, believes in your future, and accepts you just the way you are."
- What is about your friendship that makes it special? What have you been through together? Can you call each other in the middle of the night? Are they always up for a cosy night in and a natter on the sofa? Does a 5 minute phone call turn into hours of love and laughter? Are they like a 'brother' or 'sister' to you? Perhaps you don't see each other often but it always feels like no time has passed? List 3 to 5 ways that they are amazing or traits that you admire.
From a child:
- "I love you because you... and you..." - simple reasons why they are loved
- "Reasons why I love you: 1. you look after me and keep me safe... etc" - create a list of selfless acts.
- "Roses are red, violets are blue..." - help them to create their own take on the roses are red poem.
- Help them to create an acrostic poem. For example, the word MUMMY.
M is for my best friend
U is for understanding
M is for making me happy
M is for magic fixing hugs
Y is for yummy dinners
- This would also be a good opportunity to ask the child why they love the person you are sending it to as some children have some hilarious responses but some really beautiful reasons too. If they're able, allow them to write it themselves, there is nothing more special than a hand written card from a little one.
From a pet:
- Perhaps think about all of the things that the owner does for the pet. For example all the belly scratches, walks, grooming and unconditional love. Then there's also the less glamorous side like going on a walk in the pouring rain, throwing a ball covered in slobber, removing the dead or half dead mice cats so lovingly bring in as presents, cleaning up vomit after they've eaten something they shouldn't have and the list goes on. Thank them for all that they do, the love they give, and give the pet a voice. If their pet could talk what would they say?
Borrow a quote or two:
- "Genuine love involves not only passion, but also commitment and wisdom."
- "I swear I couldn’t love you more than I do right now, and yet I know I will tomorrow." - Leo Christopher
- "Love doesn’t make the world go round. Love is what makes the ride worthwhile." - Franklin P. Jones
Other things you could add:
- Cheesy poem or a pun
- Use your pet names
- Add a special surprise
- Write something a little naughty
- Not good with words? Make an old fashioned mix tape (or playlist), or use your favourite song lyrics. Do a little drawing instead or borrow one of the quotes from above!
Still looking for that extra special card? I've got a range that can be used for both Valentine's and Anniversaries! Click the image below to browse!
]]>2010 - This was the year I completed my degree in Graphic Communication at the then University of Wales Institute Cardiff. Feeling a bit lost and down hearted that it was all over and I was leaving Cardiff, I walked straight into a job on a pepper farm in my home country of Somerset whilst I tried to figure out what I wanted to do with my life.
2011 - This was the year of the grand opening of my Etsy shop, haha! I laugh because it took me well over a year to get just one sale! I may have opened it but it was a struggle. I almost closed it 3 times! But thankfully, I stuck at it and learnt how to create a professional looking store and how tags and titles worked.
2012 - A year later, I was scrolling through twitter and saw that a couple of makers had joined NotOnTheHighStreet. Having never heard of it before, I had a look, because I'm a bit nosey like that. FOMO got the better of me and on a whim I applied. Never in my wildest dreams did I think I'd be accepted. My shop was a mess, I had no real style, and to be completely honest, I didn't know what I was doing. I spent a great time thinking about it because the fee was an awful lot more than it is now and was a substantial amount of money for someone who didn't have running a business in their sights. But I bit the bullet, dove in, and got to work figuring things out.
2013 - This was the year for taking part in exhibitions, attending NotOnTheHighStreet events and meeting other makers for the first time. It was also the year of solving my printer woes (after spending a lot of money on things that didn't work for me!) and learning how to use my printer to the best of it's ability. I introduced personalised prints for the first time, out sourced my pocket mirrors and added a line of pretty earrings to my collection! I actually miss making these maybe one day I may revisit costume jewellery, who knows!
2014 - A year later, I stopped out sourcing my mirrors and saved up all of my money from my day job to buy my badge machine! Looking back, it didn't cost 'that much' but it was a really big thing at the time. I spent so long trying to decide whether to go for it and after a lot of contemplation, took the plunge and it worked out for the better! In that year I went on a badge machine crazy spree and released product after product, all shot at home, whilst working my full time job with my bugs, peppers and plants on the pepper farm.
2015 - This was the year I found of my love of scratch cards and revealing secret messages. It's hard to believe it was this long ago as it only feels like yesterday that I created my first! They're still one of my favourite products to create and I hope to add many to my collection over the next year! It was also the year that my NOTHS colour Saturday photo was used in the Metro! Seeing my silly face in that paper was really exciting and I still have a copy somewhere!
2016 - Ah yes, the year of massive highs and super low, lows. 2016 was the year my husband and I purchased our first house home together. But in the same week of buying the house, my sister was diagnosed with something you never want to hear. 2016 was also the hardest year in my day job. I learnt about being just another number on the payroll and all the previous years of hard work and dedication meant nothing. It was the year I left the stressful life of looking after a pepper crop and pursued my own dreams and ambitions. It was also the year that I started the Somerset Etsy Team and began to start meeting some amazing makers that I'm lucky enough to call my friends.
2017 - I was invited to London where I had to go completely out of my comfort zone and do a presentation for the Mollie Makes awards in front of a panel of judges. Needless to say, it couldn't have gone too bad because I won an award for my #MarchMeetTheMaker Instagram challenge! In that same year I went to Mollie Makes HQ and Pinterest HQ which was pretty amazing! However it goes without saying that the best thing to happen that was year was the wedding proposal from my now very lovely husband!
2018 - I had a go at something that I'd always wanted to try - screen printing! It was also the first year that the Somerset Etsy Team hosted Etsy Made Local in Wells! Which also coincided with me doing my first ever craft market! However, the main event was always going to be the day that I married my favourite human. It really is true when they say that it goes in the blink of an eye!
2019 - This was the year of doing really scary things. My resolution for 2019 was to get out of my comfort zone and I think it's fair to say that I did that alright! I sat on the panel for She Can She Did on the move in front of an audience of around 100 which was terrifying! And shortly before, a seagull decided to steal my sandwich straight out of my hand! I also travelled to London on my own to meet the founder of NotOnTheHighStreet to record a podcast episode in her living room! It was completely nerve wracking and I made myself ill over it because I was so nervous and not used to this sort of thing but I'm soooo glad I did it. It's one of my highlights for sure! Later on that year I was pushed out my comfort zone again when invited by a friend to join her on live radio for BBC Somerset!
2020 - I'm unsure about what 2020 holds for me but I'm really excited to find out! I'm hoping for another successful year for #MarchMeetTheMaker, lots more creative meet ups and adventures to new places!
]]>Before we start I just want to say for anyone who is on the fence about starting one of these, that you don't have to be creative or 'arty' to start one. You can draw as little or as much as you like. If drawing isn't your thing, go mad with washi tape and stickers, or just keep it simple. There are some absolutely gorgeous simple ones over on Pinterest. The best thing about these journals is that you can tailor it to fit you and your schedules!
6 Months Ahead - The first thing I always do in a new journal is set up my 6 monthly overview. This is a place where I can scribble down any important dates coming up over the next 6 months. Anything that goes here, also gets moved over to my monthly overviews later on. I typically write down any birthdays, days out, events, holidays or any important dates I need to remember.
Highlights of the year - Next up I create a page or two dedicated to reflecting on the previous year. I haven't filled this out yet because I really enjoy this page and didn't want to rush it. When I fill this out, I go back through my bullet journal from the previous year and look to see at what I did, where I went and what I achieved. I also go back over my Facebook and Instagram pages for any other moments from the year. It's a good exercise to see what you've done over the past 365 days and is also a great page to come back to if you're feeling a bit meh as it's just a spread full of positivity and good things!
Monthly overview - Each month I create a month overview with the calendar in list form. Next to the dates I use letters to show the day and blocks of colour to quickly see where the weekends fall. I then pull over any important dates from my 6 monthly overview and add any other plans that may crop as the month progresses. Here I have used washi tape and tombow brush pens to quickly put this together. On the opposite page to the calendar view, I write a list of all of the tasks I want to complete that month. Which are then moved over (week by week) to my weekly spreads to ensure they are completed. Each time I create a new week, I can look back to see what I have to do in between my usual weekly routine.
Weekly overview - Like the monthly overview, the weekly spreads don't have to be covered in drawings and you don't need to spend a great deal of time on them (unless you want to of course!) This spread took less than 5 minutes as all I did was draw out my days, jot down the dates and filled in the rest of the border with a piece of washi tape! Here you can see my tasks for the first week of the new year and there isn't a lot listed as I'm not properly back to work yet. I use crosses to mark tasks as complete and a little arrow to show that I have moved a task to a different day. If I remove a task completely, I create what looks like a snowflake instead of the cross. And those are the only symbols I use. You can use as many or as few as you like!
Weekly overview continued - this is another example of how simple you can keep the weekly spreads. It took around 3 minutes as it's simply strokes of my brush pen and hand writing. It also means that it's not too distracting from the tasks at hand. I like to keep my week over a double page so I can see needs to be done and plan accordingly. I also have half the space for Saturday and Sunday because those days tend to be less planned and much more free in terms of tasks to complete. You don't have to keep your week over a double page though. You could do a page for each new day or give half a page per day. That's the beauty of the bujo, you get to decide!
See the good in every day - This is another spread that I fell off of last year but am determined to stick to for the next few months at least! This is a spread where you jot down one or two good things that have happened that day. It can be something good that happened, perhaps you saw friends, you received some happy post, you went on a nice walk or perhaps simply, that sky looked nice that day. It's a spread all about capturing the good things in our day. It's so easy to over look the good and dwell on the bad. At the end of the month, you'll end up with a double page spread positivity that you can come back to when the negative feelings crop up and you can re-live the good. I usually do this in black and white but saw a page I quite liked on Pinterest so used part of it here.
That was a brief introduction to how I set up my bullet journal but there are so many other ways and things you can use them for! I also use it for emptying my brain, planning new ranges, researching seasonal occasions etc. If you want some more inspiration I've made a pinterest board too! Don't be afraid of making mistakes, or errors on these pages. I made a mistake on nearly all of these pages but you will be the only one to know its there!
If you want some links for supplies I'll some below!
Dreamer Planner Storage Pouch - Joanne Hawker (me!)
Pens and Bullet Journals - Nikkis Supply Store
Washi Tape and Stickers - Check out Etsy! - also, remember, if you are shopping through Etsy to use TopCashBack* to get a kickback on your purchase! It works for loads of other websites too! *affiliate.
I hope that helped a little if you are thinking of starting a journal! If you go ahead and start one or are inspired by any of my spreads, I would love to see them!
]]>Here we go! #MeetTheMakerWeek has officially launched for the 4th year in a row! The challenge officially kicks off on the 2nd December and aims to be a week full of designers, makers, crafters and small creative businesses telling the world about their wonderful businesses. By posting the prompts so far ahead of the challenge, it gives you plenty of time to think about what you want to say and plan ahead should you want to.
This is the official list of prompts for 2019, and you can interpret them anyway you wish, but if you need a little extra help, don't worry, I've sorted that too! I don't want to be scaring anyone off, especially those feeling nervous about doing their first challenge, don't worry! I've got your back!
If you'd like a little more guidance, there are helpful questions on the free downloadable planner sheet to help you plan your content and also explains a little more about what each of the prompts could me! There's a little info about useful apps and a list of key things to remember. Wanna grab the planner? Simply click the image and it will take you to a page where you can download the planner for freeee! Keep it for later or print right away. Easy peasey!
Need a little more guidance? Here's my notes on each of the prompts:
Your elevator pitch - Has someone ever asked you what it is you do and you were completely off guard and didn't really know what to say? This has happened to me so many times and I end up belittling my business and down playing it. So this is an opportunity to really nail the answer to the question 'so, what do you do?' Think about what you make, or if it's a service, what do you provide? What do you want to do? What's your aim etc. Be confident. Don't play it down. You've got this.
Range, collection or make - This is your chance to expand on certain aspects of yesterdays elevator pitch. Do you have a new range you want to talk about in depth? Or a collection you haven't really promoted? Is it seasonal? Who is it for? What inspired it? Do you get any frequent FAQ's about your products? Answer them! Talking about our work can feel icky at time but today is an excuse to go wild. Tell us everything, we want to know all about your makes!
Behind the scenes - Forget the Insta perfect workspaces we want to see how it really is! Kitchen table, sofa, dedicated space, or close up process shots, it's all completely valid! Going behind the scenes is so fascinating for so many people and it gives others (perhaps your potential customers) a chance to see where the magic is made. Do you have any special processes? Interesting tools? Special glazes? A trusty sewing machine, favourite paints etc. What may seem simple and mundane to you, is new, exciting and interesting to someone who isn't in your industry.
Where else - This is all about where people can find you outside of Instagram. Are you on Facebook? Do you have an online shop? Perhaps you've got a newsletter? Or maybe people can come see you in person at a local market? What is the benefit to them coming to find you outside of Instagram? Why should they sign up to your newsletter? Why should they come and see you at your next market? What are you taking with you? Give them a reason to track you down outside of the app.
Audience interaction - This is all about giving people a reason to interact with your brand. Make them feel involved. Perhaps you've been trying to make a decision about a new range and need opinions? Ask! Perhaps you need help sourcing something? Ask! Ask a question, ask for feedback, vote for favourites, create a poll or polls on stories, ask for help, make a quiz, find a way to allow people to interact with your brand. Remember to reply to any comments!
Shopping small - Now, more than ever we need to encourage our friends and family to shop small. What does it mean to you when someone places an order with you? How does it make you feel? How does it benefit you as a small business? What are the benefits to the customer? What can you do for them that the likes of Amazon can't do? Show off some more of your amazing makes or get together with friends and promote each other. Share the love and shout out other small businesses! We're all in this together!
I hope that's helped a little but if you have any other questions please put them to the Hey There Maker Community, a group that I run over on Facebook! It's a safe place to ask questions about anything challenge related or being a maker in general! It's a place where we can help each other succeed. Because after all, whose better to answer questions on small business and making than small businesses and makers themselves? Be sure to answer the questions when applying otherwise I can't let you in. Don't worry, it's not a test! It's simply to keep the spambot accounts out! Like the idea of that? Click here to join!
The important bits recap:
- Prompts released 20th November - they're out now!
- Challenge begins on the 2nd December and ends on the 7th December
- Download the FREE planner
- Keep a look out for a small business giveaway!
- Join the Facebook Community Group
- Join in, network, support each other and most of all, have fun!
Maker week is fast approaching and in the blink of an eye it will Christmas! This is the 4th year running for #MeetTheMakerWeek I'm so excited to be back for another year! If you're here it means that you're interested in taking part, hooray! I'm so excited to have you on board!
What is #MeetTheMakerWeek?
In short, #MeetTheMakerWeek is the little sister of #MarchMeetTheMaker and is a week long Instagram challenge with the aim of showing the world a bit more about what you do. Giving you the perfect excuse to talk about yourself! It can be difficult at times to big ourselves up, and really show off what we make. It's also a great opportunity to let people in behind the scenes. It's a chance to be really proud of what you create, the skills you have learnt and to tell the stories behind it all. It's a chance to find new makers that you may not have otherwise found, it's a chance to network and make new connections but most importantly, it's a chance to put yourself out there!
Sounds good but how do I take part?
Well that's super easy! The official prompts will be released on the 20th November (challenge begins on the 2nd December) giving you plenty of time to prepare in advance and think about what you want to talk about, should you want to. As with all of my challenges, they come with a free planning download with a bit of extra help should you need it. This will be available when the prompts go live. Completing the challenge is a lot easier if you have content or a basic idea prepared in advance but if you'd rather wing it, then I'm sending you a virtual high five right now! To take part in the challenge, all you need to do is post at least one photo a day related to the prompt of the day and post it to Instagram and use the hashtag #MeetTheMakerWeek. For example, if the prompt was 'workspace', you could post an image of where you make your products.
Do I post to my grid or stories?
That's entirely up to you! If you post to your grid, the content is still there for potential future customers and you'll show up on the challenge hashtag, and have the potential to be seen by the other brilliant makers taking part or anyone following the hashtag. Posting to stories often means there is less pressure on the content sides of things and they only stick around for 24 hours. They're a great place to practice talking to camera, or talking with the camera pointed at your makes (if you want to!). Or you're feeling up for it, you could do a mixture of both! Either way, both ways are totally valid! Just remember to use the hashtag #MeetTheMakerWeek.
What if I get stuck? Can you help me?
I set up a maker community over on Facebook where you can all help each other with the posts should you get stuck! It's also a great place to ask questions that you might be struggling with which aren't necessarily challenge related. We're called Hey There Maker! And we're a friendly bunch, promise! If you'd like to join, make sure that you answer the questions, it's not a test, it's just a way to keep spam bots out!
I look forward to seeing your posts, learning more about your makes, your wonderful business and finding new talent to follow! See you on the 'gram!
]]>You've spent ages looking for the perfect anniversary card for your other half, but now comes the hard bit, what do you write inside it? For me, this is usually the hardest part of sending a special occasion greeting card so I've put together a list of things that you could say or some ideas that may help to inspire your own personal messages.
Before we begin, I just wanted to put it out there that you don't have to fill an anniversary card with mush. You can go funny, sarcastic, to the point, simply cute (or if you want to pour your heart out, go for it!). Just do what feels right to you!
To your other half:
- "Thank you for another amazing year together, and here's to many more."
- "Thank's for putting up with me for another year!"
- "Here's to yet another year of annoying the crap out of each other."
- "Happy anniversary to my best friend and my favourite human."
- "Here's to another incredible trip around the sun together."
- "Happy anniversary to the kindest, most funny, and loving person I know."
- "I'm so lucky to have you, happy anniversary to my best half."
- "Happy [insert number of years] ... together! Love you more and more each day."
To a another couple:
- "Sending lots of love and warm wishes on your anniversary."
- "Wishing you all the happiness in the world!"
- "Happy anniversary to my two favourite people."
- "I can't believe it's been [X many years] since [insert favourite memory from their wedding day]. Happy anniversary!"
- "Wishing you both a life time of happiness."
- "Happy [X years] anniversary and here's to many more to come!"
- "May the adventure continue!"
- "I remembered this time! Happy [insert number] anniversary!"
First wedding anniversary:
- "You are my sun, my moon, and all my stars." - E.E. Cummings
- "A year ago today, you made me the happiest person on earth."
- "A year ago today I was lucky enough to marry the kindest person I know, my best friend and favourite human. Happy first anniversary of the happiest moment of my life."
- "Happy first year of being legally stuck with me!"
- "We made it! Happy first wedding anniversary!"
- "Happy one year of drinking 3650 cups of tea, 52 bars of chocolate, 12 dates, and 2 trips to our favourite place." - replace with your own personal facts!
Last anniversary before you wed:
- "This time next year we'll be husband and wife [or husband & husband, or wife & wife].
- "This time next year we'll be Mr & Mrs [mr & mr etc.]
- "This time next year we will have started a new adventure and will have a new anniversary to celebrate!"
- "This time next year I will have said 'I do' to my best friend and my favourite human. I can't wait to marry you!"
- "Happy last anniversary as Mr [insert name] and Miss [insert name]. I can't wait to Mrs [insert name]!"
- "Happy last anniversary before you are stuck with me for life!"
Milestone anniversary:
- "Sending big love on your big anniversary!"
- "Congratulations on so many wonderful years together!"
- "[X number] of years of memories since you both said I do."
- "I can't believe it's been [X many years] since [insert favourite memory from their wedding day]. Happy anniversary!" - this one can be re-used if you attended their big day all those years ago and perhaps share a memory they may have forgotten about!
Still need to find that perfect card? You can shop my range of anniversary and special occasion cards by clicking on the image below!
]]>In the week running up to the wedding I was really worried that I wasn't going to sleep the night before and that I'd be a right grumpy git from lack of sleep! Luckily for me, I stayed over at my mum's house so it wasn't anywhere new to get used to sleeping in and the bed was super comfy. I slept like a log! However, when I woke up, it was absolutely pouring it down with rain! I always said that I would be disappointed with rain and thought it would stress me out, but I really didn't care - after all it's supposed to be good luck if it rains on your wedding day!
All throughout the wedding planning process my mum loved the idea of hosting a mini tea party on the morning of the wedding and so she spent months scouring charity shops for a tea pot, cups and saucers, a cake stand and a little milk jug. It was a perfect variety of mismatch! Then both my mum and my cute little nan baked cakes for the tea party and needless to say, it went down a treat, especially as the next meal wasn't going to be for ageeeees!
Hannah came over nice and early to start working on my hair and my bridesmaids hair too! Even my brother got in on the action, but insisted that no photos of him were taken getting his hair done (but there are a couple floating about!) I went for a half up, half down, curly, wavy style do with a flower crown pinned in on top. I really enjoyed having wavy hair, so much that I'm wondering if I attempt the curly girl method to see if I can achieve waves with no heat!
I had to get to Hornsbury Mill, Chard by midday so decided that I would put my dress on there because I'm that kind of person who would get my dress stuck in the door of the car or clean the side of the car with my dress as I got out of it. And, as it had been raining, this was definitely the best idea. So once we got there, my mum helped me into my dress, my bridesmaids tracked down a bottle of prosecco and checked in on Ross and we generally sat around and had a nice time hanging out of windows and waving at guests as they arrived. Weirdly enough, there were no nerves whatsoever!
When all the guests were seated and I was called to make my way down I was so excited. The ladies who were sent to show me the way and make sure I walked in on time found it really funny how fast I was walking. I was practically running there! I guess I didn't have the struggle of heels because I was wearing a pair of Rifle Paper Co trainers. Best decision ever!
When we got to the waiting area I saw my brother running towards me, make a sharp u-turn and run straight back into the ceremony room. It doesn't sound funny written on a blog but remembering the motion of how he quickly spun on his heels and ran in the opposite direction makes me laugh.
I'm a real time keeper. I cannot be late, I can't stand being late and it really annoys me when other people are late. I can be early but never late. So luckily for Ross, I was never going to do the fashionably late bride thing on him and he didn't have to wait around anxiously for long! Before I knew it, I was at the end of the aisle! No nerves and no tears (I was so scared that I was going to cry through it and snot everywhere!). But thankfully that didn't happen! Even Ross was a little early when it came to his vows! He jumped in and said 'I do' way before he was even asked and needless to say everyone laughed!
We had our friend Alice and Ross' brother Mark do readings during the ceremony and I'm really glad we did because the ceremony part flew by. We (I say 'we' probably more 'I') initially didn't want to do any because it was so difficult to find readings that weren't over the top mush or ones that we felt we could relate to us. But we eventually settled on Wild Awake - Written by Hilary T Smith and Recipe for Marriage - Written by Joanna Miller.
I honestly can't remember which part of the ceremony this photo was from, but I really wanted to include it. So I'm not going to make up some waffle to go with it. I'm just going to gently leave it here and move on!
Rings - tick! Signing of the register - tick! Groomsman almost setting his hair on fire - TICK! Yes that really happened! And it served a warning for the Bridesmaids who had their photo taken next and were all wearing a considerable amount of hair spray! That could have ended so badly! But luckily no one was hurt and it was just a funny story from the day.
And just like that, the ceremony was over and we were pronounced husband and wife! The rain stopped and we all emptied outside with a glass of bubbly and huge smiles on our faces! It felt like the family photo session took forever! With 3 different families to photograph and two of those not wanting to stand next to each other, it felt like a mammoth job and even then, we didn't get all of the shots I'd wanted. Somehow the list was lost, tears were shed later on but what's done is done.
Perhaps one of the funniest photos from the day is probably the one of a guest with his trousers around his ankles. Don't worry, I'm not going to post it here. He got a tattoo of a love heart with the words 'Oh Ross' inside it on his leg on Ross' stag do a month earlier and decided to drop his trousers to show Ross' mum! It's not every day your friends drop their trousers to the mother of groom so that's one we definitely look back on and laugh.
We decided to go for yellow, white and blue tissue paper hearts for our confetti and spent hours and hours in the run up separating each tiny heart so that they could be thrown! A job that I thought would only take a few hours actually took many many evenings! I absolutely love this photo for it's big splash of colour, happy faces and for revealing the culprit of who covered my hair in dried roses!
We then went off to take pictures of just the two of us. This is the terrifying bridge of doom. It's very narrow, incredibly slippery and felt like we were going to fall in and it looks like my dress nearly did!
This bridge was much less terrifying but is often guarded by two large birds (they might be geese but I'm unsure) and every time you go near they bob their heads in a way that look like they're dancing but thankfully they must have been on their lunch break or something when we took this shot.
And ta daaaa, I saved my favourite one until last.
Soon we were whisked away from taking photos to start the speeches. As always there some lovely stories, jokes and harmless banter. In true Ross style, he considered the main event as being the food. The best man thought I'd picked the wrong Thompson brother and mentioned which one he'd have chosen instead, and my dad didn't tell any embarrassing stories about me like I thought he would!
Before we knew it, we were cutting the cake, not because it was time but because it was actually going to topple over if we didn't! Most people didn't even know it was happening because it was that rushed!
We made ourselves a home made photo booth for the guests to play with. I had an old SLR that I'm not precious about, a tripod and plenty of tissue paper! It got a lot more use than I expected and going through some of the shots afterwards were hilarious. So much so, they're not suitable for posting online. You know who you are!
I'm going to stop sharing photos from here on in because we all know what people look like after a few drinks at a wedding but here some more of the most memorable moments.
- Ross got up and joined the band and played the drums along to Jimmy Eat World's The Middle. He did pretty well considering how drunk he was.
- At one point we ended up with a mosh pit on the dance floor.
- We also had someone climb into the rafters and hang upside down all the way along the venue! The band said our wedding was one of the rowdiest one's they had played in a while.
- If the van is a rocking, don't come knocking. That's all I'm going to say on that matter - you know who you are haha!
- Younger guests chatting up ones old enough to be their parents.
- Ross drunkenly fell out of bed in the middle of the night and took a huge lamp with him.
I think I'm going to leave it there because it seems to have gotten pretty lengthy. If you've made it this far then you deserve a high five! And I hope you've enjoyed a small window into our big day!
• Photographs by Daniel Standerwick
]]>After 9 years together, Ross finally popped the question on the 6th October 2017 on top the cliffs in Perranporth, Cornwall! It was already my most favourite place in the country and now it's even more special! Little did I know he had spent months agonising over finding the perfect ring on Etsy and even roped our good friend Alice into helping him get it without me knowing! I absolutely love the fact he got it from another maker (Doron Merav) and it's a tiny twig! I don't think I could have chosen better myself!
I always knew that I was going straight to Etsy to get my wedding band! But I was so overwhelmed with choice that I just didn't know what I wanted. It's no secret that I'm not a jewellery wearer at all. I wasn't allowed to wear it when I had the day job so I never got into the habit and I always forget about it! So wearing an engagement ring was weird enough!
So what did I do? What I always do when I get stuck, ask Instagram of course! And my goodness they did not disappoint! I found sooooo many talented makers was spoilt with choice and offers of help! Someone recommended Fire White to me and I fell in love with Candice's simple but gorgeous rings! She was so helpful in ensuring I got the right product and after a bit of back and fourth, I finally settled on my organic texture ring!
Ross' ring was passed down through his family and is actually his great Grandma's wedding band! The beautiful inscription from around 100 years ago is still on the inside of the ring which is a wonderful thing to treasure.
Our wedding was also the first time I had ever had my nails done professionally and still is the only time I've had them done! I popped over to visit Beauty Box by Holly and she did a wonderful job and it was actually a really fascinating process! In true Joanne style, let them grow out until they looked ridiculous before I eventually figured out how to take them off!
Oh the ladies who helped me with my dress! I can honestly tell you, Somerset Bridal was the most amazing dress shop I visited! And I visited a lot of shops. Seriously, I was slowly running out of shops in Somerset to visit as I was being that picky! Let me tell you why they blew me away with their service...
My first visit with them was brilliant, all went well, they weren't pushy, told me to think on it and told me they were having a 'trunk show' at the end of January if I wanted to attend. I did want to go because it was with my favourite designer, Watters. The only problem was, the only date I could make was on the day I was due to fly home from Portugal! No problem they said! I could have the last slot of the day and I would drive straight there from the airport. Brilliant! That is until my flight got massively delayed and the shop would have been closed by the time I got to them. I sat in the airport and cried my eyes out and messaged them to let them know I couldn't make it. To my surprise, it wasn't a problem, do you know what they did? Told me to let them know when I land, and give them an estimated time I'd be able to get to them and they would could back and open the shop so I could try on the visiting dresses. And that's exactly what they did. I couldn't have asked for better service. Every time I go past I can't help but have a quick nose through the windows at all of the beautiful dresses! Debbie and Roberta, you really are the best!
I teamed my Watters dress with a bright yellow cardigan. I had to get yellow in there somewhere right? You'll see more of my dress in the next post with the main images from the big day itself!
To begin with, my mum and I had grand plans of doing the flowers ourselves and roping my nan in too but the reality of growing enough flowers and the pressure of it going horribly wrong led us to find the lovely, award winning Charlotte of Fleur Amour! And I'm incredibly glad I gave up that idea because I couldn't have done a better job. For a start I didn't know what any of the flowers I wanted were called. I believe my brief to Charlotte was, yellow, blue, bit of leafy things and those yellow balls on sticks... Haha! I loved my bouquet so much that I dried it out. Badly, and it smells a bit funky but I'm still not ready to let go of it. And the same goes with my flower crown! That is currently hanging up in my lounge and won't be going anywhere anytime soon!
I spent hours on pinterest pinning photos of the dream cake and I quickly realised that I was into these 'semi naked' cakes. But at every wedding fair we visited, I saw a lot of full iced cakes and I'm not really an icing/marzipan person. I find it way to sickly and often there is way too much. So when I spotted Hip Pop Cakes and their semi naked cake I made a bee line for their stand and wanted to know everything! A little while later we were sat in Lesley's kitchen eating our way through an array of amazing samples! We settled on three different flavoured tiers! Pink champagne (without the pink colouring), Victoria sponge and Elder flower. The elder flower was definitely my favourite! The champagne flavour was a complete surprise to us. We didn't think much of the idea until we tried it and then just had to have it! It was a real shame to cut it up because it was so pretty!
I had grand plans of making our cake toppers out of air dry clay but seeing what a nightmare it was with other projects I used it for I decided to give it a miss because I knew I'd never get a finish I'd be happy with. That is where the lovely Jane Kent comes in! I'd been following her on Instagram for a little while and absolutely loved her work. I knew she was busily prepping for a show but couldn't help but cheekily ask if she would make me a custom cake topper in yellow and blue! And lucky for me she said yes and we now have three of them around our home!
This week I discovered that Martha Brook now does bullet journals too! Whaaat! How has it taken me this long to discover that? I'm genuinely considering cheating my yellow bujo for one of her foiled beauties! Anyway enough of that. Martha kindly gifted us one of her gorgeous wedding guest books for our wedding and it was so pretty! I didn't want anyone to write on the first page so I could add a photo to it but apparently no one got that memo! It's such a beautiful book of memories from all of the wonderful humans that took the time out of their busy lives to attend. I actually cried reading it after the wedding. It's so full of love and is the perfect way to capture those precious messages! Thank you Martha, I'll be forever grateful for your kindness!
When I was little, I nagged my mum for ages to my ears pierced. I was in primary school and all my friends had theirs done and my best friend had hers done too. Eventually my mum gave in and took me to the local piercing shop. I was allowed to choose my first ever pair of earrings and I went for a pair of little gold stars. They were my favourites! Over the years though, I lost them. They were my first and my faves and I was gutted. So when my dad said he wanted to buy me some earrings for the wedding I jumped at the chance at getting a new pair! That is where the lovely Alison Moore comes in. Alison has a pair of moon and star earrings and I asked her if she would mind making me two stars and it wasn't a problem! And now, because of the power of the internets, I now have a pair just like the ones from my childhood.
This is such a terrible photo and I apologise to advance to the lovely Charlie of Stitchsperation who so kindly made us several metres of bunting for our top table. I've searched through all of our wedding photos and I can't find one where you can see it on the table, which is really sad because I liked our top table! I've already found another use for it and that is to decorate our spare room! It's draped along two of the walls with our paper pom poms hiding the hooks every so often!
My dad is the MOST difficult man to buy for. He doesn't want anything, and if he does he just goes out and buys it himself. So getting him something for the wedding was a huge task! Not only that but he is picky and so am I! I eventually stumbled across these personalised initial cufflinks by Penelope Tom and they went down an absolute treat alongside a card I had designed for him. He couldn't wait to take his standard cufflinks off and replace them with these. And Ross liked them so much, he got his dad the same ones!
We also had a number of signs we designed printed for us by Becka Griffin and Lela from Doodlelove as I've only got a little A4 printer which didn't quite cut it! This one was especially important as it accompanied the ladder we had covered in family photos of those who couldn't be there with us on the big day and were instead partying it up in the stars.
I knew I wanted to create my own cards for giving to my parents on my big day. Not only because I wanted to give them something I had made but because I knew I'd need to write it several times. I believe it took me 3 attempts at writing my dads card and the same with my mums, so I knew I made the right decision when I could just run them off myself! I didn't upload these until well after the wedding because I wanted my family to have the first ones. And if you look hard enough, you can see that I actually used my wedding dress as the back drop. I even gave Ross one and when he opened it a cod illustration fell out haha. Don't ask, but I thought it was pretty funny! I've made an entire range from these with an option for all of the family. You can see these here if you wanted!
I know this post was pretty product and text heavy but I just wanted to share a few of the makers and small businesses that helped us to make it such a wonderful day. Don't worry though, I'll be sharing more of the actual day and what went on in part 2! There's a tea party, plenty of wedding shots and lots of stories to tell! See you next time!
]]>Quite a few years ago I decided that I wanted to turn my handwriting into a font and I spent hours doing that annoying thing where you have to print out a bunch of boxes, fill them in and then upload them to the internet. Whilst this method works well for some people, I just wasn't satisfied with the results. Shortly after I discovered an app, borrowed an iPad from a friends workplace and set about drawing my font with one of those little dabbers on the screen. You know, the plastic sticks with a blob of rubber on the end?
It took days using that blobby stick! But, I was really pleased with my first attempt at it. As I didn't really know what I was doing with the app, I missed the whole section about kerning and generally polishing it up at the final stages. So it definitely wasn't as good as it could have been!
Fast forward a few years and I felt like I wanted to give it another go! I'd just become an ambassador for Skillshare at the time so I made this my first project! Using skillshare meant that I could actually learn about the bits I'd missed off my previous attempts and hopefully create something that I'd be a lot happier with.
So, what do you do and is it easy?
It honestly couldn't be easier! I used the app iFont Maker and essentially, you are drawing over a pre-existing font. This helps to ensure that the height of your letters and ascenders and descenders are consistent. There are a variety of fonts to choose from but I think I just went with the standard one.
It helps if you know your way around vector paths because you can edit these shapes by adjusting the anchor points. Once you're happy with a letter you simply move onto the next. You work your way through the upper case alphabet first and then move onto lower case. It's really quick and I think I created my entire font over two evenings (mainly because I'm picky! But, it could have been done a lot quicker!).
Once you're satisfied with your letters, you can then move onto numbers, punctuation and as many alternative characters and accents you want! You don't have to fill them all in if you don't want to. I did quite a few on this font because I missed so many on my first one that it became restrictive when I was trying to make something that required a £ symbol or an accent, so I didn't want to make that mistake again!
After you've included all of the characters you want to use, you can then start to edit the spacing between the letters. This is known as the kerning. You're given a variety of phrases and troublesome lettering pairs to go through and adjust the spacing on. I won't attempt to go into depth about this because it's not something I know a huge amount about but it is an important step!
Also, top tip! You can check to see how your font is looking as you go along. Simply use one of the pangram options or write in your custom text to see how it looks! It's a great way to quickly test how your font is looking and if you're happy with the direction your design is going in!
Once you're happy that you've made all the necessary tweaks that you want and tidied up any letters that you're not fully happy with then it's time to export it! I set my font to private because I don't want it publicly available. Downloaded it, sent it to my laptop and installed it! And now it's there to use whenever I want! I can access it in illustrator, photoshop, microsoft word etc etc!
Easy peasey! If you want to join skillshare and check out the font making video too then I can give you a free trial by clicking here! - for transparency purposes, it is an affiliate link but I'm probably going to sign up when my free trial is over too because there is just too much I want to learn over there!
Anyway, I hope this was useful! If you decide to make your own, I'd love to know how you get on!
]]>I posted what I was planning to do on Instagram and I was overwhelmed by peoples reactions. There were lots of people who already do this and have noticed a positive change from just writing down one or two, or even more good points from their day. No matter how small. A few of my little moments include sitting in the sunshine, a catch up with a friend or even just how pretty sky looked on the way home.
And I was also told by the lovely Gabrielle (the over thinkers coach) that there is research to suggest that this form of gratitude practice is proven to improve wellbeing in real ways. No only this but by the time you get to the end of the month you've got a whole month of positivity to look back on!
I thought it would be a good chance to show you how I set up my bullet journal for the month of June incase you also want to do the same and let you know how I got on with writing down the good things for a month! I was actually surprised with how it went...
So, this is the spread that I created for June and below is a close up of July. I decided to keep it simple black and white so that it wasn't too fussy as I knew I would be filling the whole thing with writing! I also wanted something that I wouldn't be bored with or distract me from what the spread was about.
I find setting up bullet journal spreads very therapeutic anyway so I quite enjoyed drawing this one up. But you can keep it much more simple if you're not into decorating your pages. I left two lines for each of days to fill with my positive things from that day. I thought that would be too much until I started filling it in and realised I could probably write a bit more but it's a good starting point.
I found that making a note of every (or most) good things throughout the day has so far led to a more positive mindset and I actually look forward to filling it in at the end of the day.
This was actually put to the test on the 10th July when we headed off on our holiday to Norway. When we got to Gatwick our flight had been 'delayed' because of air traffic control problems, sure it was annoying but it was what it was. But not long after we saw that notice we had a text from Norwegian saying that they had cancelled our flight. To rub salt into the wounds, they wouldn't rebook us onto anything else, were less than helpful, rude in some cases and we spent an hour on hold trying to reach their telephone sales team.
And this is where I think this journaling helped. We were told we couldn't fly direct to our destination until Friday (it was Wednesday), unless we went direct via Barcelona, in which case we could fly Thursday. So we reluctantly took that flight (sorry earth, we really do love you). It wasn't until I over heard others talking saying they couldn't fly until Saturday that I felt truly grateful that we even had the chance of taking this super inconvenient flight.
Usually something like this would have ruined the holiday for me. But instead I was grateful that we had to sleep in the car to get this flight. I was grateful that we had to spend 6 hours stuck in Barcelona airport. I was grateful that we got there 24 hours later than we should have. A few months ago I probably would have had a huge sobbing sweary melt down. But that didn't happen. I think that's partly due to the general calmness of Ross and partly due to this.
So it's looking like I'm going to be keeping this as a regular habit! I like being challenged to push past my negativity and find the good things from my day and I'm excited to see where else this helps! If you've kept one, I'd love to know how you got on and if it's had any effect on your day to day!
]]>
1. A simple paper thank you
A card with a simple thank you message goes along way. Even more so if it has been written by a child who has done their very best hand writing especially for you. There is something magical about the way children write. Sometimes a simple thank you can mean more than material goods and has the ability to raise a lasting smile. I stock a range of teacher cards to suit all budgets. Starting from £3.25 with FREE UK delivery up to personalised cards at £4.95, click the image (or here) to find out more.
2. A certificate for being the best
After my popular Father's Day newspaper download I thought it would be a great idea to create something a little extra special for the teachers too. They spend all year praising the children and celebrating their achievements with stickers, positive encouragement and certificates. So how about a certificate created by your little ones especially for their teacher? It's sure to raise a smile! And best of all, it's free! All they need to do is sit down and colour to their hearts content! Click here to download and save yours now!
3. Happiness is homemade cakes
Everyone loves a cake right? But if you don't want the trouble of accidentally burning them or having to do icing with the kids, how about some no bake rice krispy cakes? Perhaps jazz them up with a few marshmallows or sprinkles? Or even pop in a few flags using my homemade personalised flags below! Or perhaps you don't have the time for baking? Then no worries, because if you pop down to Aldi (not sponsored I just happen to shop there) then you can pick up a tray of 12 cupcakes for £3.49! A sweet treat for the teacher at a budget friendly price!
How to make the Rice Krispy Cakes:
To make rice krispy cakes all you need to do is the following:
1. Melt 150g of milk chocolate into a heatproof bowl (either over water on the hob or gently in the microwave) and mix in 3 to 4 tablespoons of golden syrup.
2. Once the above has melted, stir in 100g of rice krispies! (Although I used coco pops because it's what we had in the cupboard and they're already chocolatey!)
3. Divide the mixture between 12 fairy cake cases (less for muffin cases) and pop on a few decorative bits you want to stick. You could use fudge, marshmallows, smarties, etc. I used bits of fudge (already in the cupboard) and some small marshmallows.You could also melt some more chocolate and drizzle over the top!
4. Wait until they set (you can speed this up by popping them in the fridge for an hour) and then enjoy! Or rather, give them to your favourite teachers!
4. A touch of something personal
So you've made your krispy cakes or you've bought a tray of fairy cakes and you want to jazz them up a little to make them more personal to your little ones. Well, how about making some pretty little bright flags to stick in the top? Homemade personalised cake toppers! On one side is a hand lettered message such as 'you are brilliant' and on the other side is space for your child to write their teachers name! All you need is a printer, some paper, scissors, glue, cocktail sticks and your little creative genius! These little flags are available through my Etsy at just £1.50! For £1.50 you get 3 digital files! One contains a black and white copy so your child can go wild with colour, and the other two contain variants of pink, yellow, blue, purple and green! If you want more information or to download, click here!
5. A pet for the teacher
If baking isn't something you want to consider how about a little pet for the teacher? A small cactus doesn't require much looking after and it can easily sit on the teachers desk or be taken home. You could also personalise by adding the little flags above! I got this cactus in a pack of three from IKEA for only £4.50! That's only £1.50 a plant! Budget friendly and a kind and thoughtful gift! If I was a teacher I'd be all over this little gift! I love a cactus or ten!
I hope this alternative, purse friendly guide to thank you teacher gifts has been helpful! If you decide to use any of the ideas above, I would absolutely love to see them! I'm @Joannehawker over on Instagram if you fancied sharing! Seeing other people use my downloads always brings a smile to my day!
]]>